Friday, August 1, 2014

Getting Started with PowerShell Modules, Part 1

Modules

Modules are the key to organizing you PowerShell code in a logical way. There are two ways to write modules:
  • .NET assemblies
  • PowerShell advanced functions
Which you use depends on what components you are interacting with and how easily you want your end users to be able to modify the finished product.

Creating a .NET PowerShell Module

I really have to commend Microsoft one this. Creating a new .NET cmdlet module is trivial. Contrary to the convoluted hoops you have to jump through to do something things in .NET it is a refreshing change.
Here are the steps:
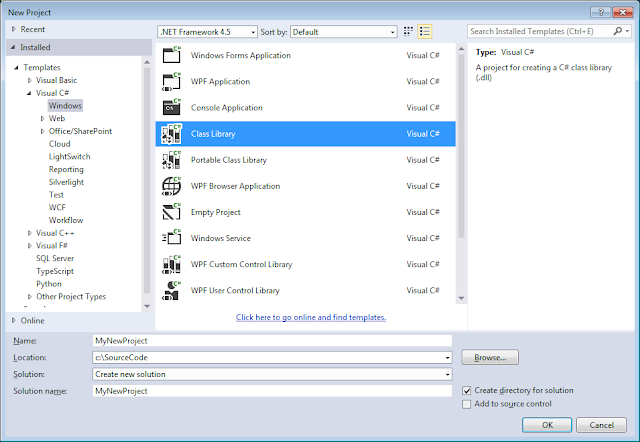
  1. Create a new Class Library in your favourite language.
  2. Target the correct .NET Framework version for the PowerShell version you want to support.
  3. Reference the System.Management.Automation assembly.
  4. Derive a class from Cmdlet or PSCmdlet and decorate it with a Cmdlet attribute.
Here is a table showing how the framework versions correspond to the PowerShell versions:
PowerShell v2PowerShell v3PowerShell v4
.NET 3.5.NET 4.0.NET 4.5
If you are not sure what version of PowerShell you are running, you can find out by running the following command:
PS C:\> $PSVersionTable.PSVersion

Major  Minor  Build  Revision
-----  -----  -----  --------
3      0      -1     -1

Details

Step 1: Create the Project
Select File->New->Project… from the Visual Studio menu.
New Project

Step 2: Target the Framework
Right-click the project and select Properties. Select the appropriate framework version from the Target framework dropdown.
Target Framework

Step 3: Add the Assembly Reference
Right-click the project references. Select Add Reference and browse to
C:\Program Files (x86)\Reference Assemblies\Microsoft\WindowsPowerShell\

Then browse into the appropriate subfolder for your version. For me that was 3.0. Select System.Management.Automation.dll and click the Add button.
Assembly Reference
Step 4: Create an Derived PSCmdlet Class
The basic skeleton follows:
using System;
using System.Management.Automation;

namespace Namespace
{
    [Cmdlet(VerbsCommon.Get, "Something")]
    public class GetSomething : PSCmdlet
    {
        [Parameter(
            Mandatory = true,
            Position = 0        
            )]
        public string Name { get; set; }

        protected override void BeginProcessing()
        {
            base.BeginProcessing();
        }

        protected override void ProcessRecord()
        {
            base.ProcessRecord()
        }

        protected override void EndProcessing()
        {
            base.EndProcessing();
        }
    }
}
That is it. The BeginProcessing and EndProcessing are not required. So a really simple cmdlet would like this:
using System;
using System.Management.Automation;

namespace Namespace
{
    [Cmdlet(VerbsCommon.Get, "Something")]
    public class GetSomething : PSCmdlet
    {
        [Parameter(
            Mandatory = true,
            Position = 0        
            )]
        public string Name { get; set; }

        protected override void ProcessRecord()
        {
            WriteObject(Name);
        }
    }
}
Once you compile your project into an assembly, you have created your first PowerShell module. To use the module, you need to import it.

Importing .NET Modules

Modules can be imported in the same three ways that scripts can be run, relative reference, absolute reference and by placing it in your path. However, the third is slightly different for modules than scripts.

Relative Reference
PS C:\SourceCode> Import-Module MyNewProject\bin\Debug\MyNewProject.dll
Absolute Reference
PS C:\SourceCode> Import-Module C:SourceCode\MyNewProject\bin\Debug\MyNewProject.dll
Installing it in your Module Path
First, verify your module path by running the following:
PS C:\> $env:PSModulePath
C:\Users\swoogan\Documents\WindowsPowerShell\Modules;C:\Windows\system32\WindowsPowerShell\v1.0\Modules\
The first path is specific to your logged in user. The second is a system wide path available to all users. Any additional paths may have been installed by third parties.

This leads to two possible options for you to install your module. You can either put it in a directory already present in your PSModulePath, or you can create a new location and add it to your path. I recommend using what is already there.

Now, note that there is a little trick to installing modules this way. You need to create a folder in the module path with the same name as your assembly. For example, if you assembly is MyNewProject.dll, then you need to install it into a subfolder called MyNewProject. Here is an example of performing the installation:
PS C:\> $path = Join-Path -Path $env:PSModulePath.Split(';')[0] -ChildPath MyNewProject
PS C:\> mkdir $path


    Directory: C:\Users\csvingen\Documents\WindowsPowerShell\Modules


Mode        LastWriteTime      Length  Name
----        -------------      ------  ----
d----       8/1/2014   1:24 PM         MyNewProject

PS C:\> Copy-Item .\SourceCode\MyNewProject\bin\Debug\* $path -Verbose
VERBOSE: Performing operation "Copy File" on Target "Item: C:\SourceCode\MyNewProject\bin\Debug\MyNewProject.dll
Destination: C:\Users\swoogan\Documents\WindowsPowerShell\Modules\MyNewProject\MyNewProject.dll".

To make sure that you have installed your module correctly, run the following:
PS C:\> Get-Module -ListAvailable

    Directory: C:\Users\csvingen\Documents\WindowsPowerShell\Modules


ModuleType Name                                ExportedCommands
---------- ----                                ----------------
Binary     MyNewProject                        {Get-Something}
Script     Swoogan                             {Find-InFiles, grep}

...

Notice that the type of MyNewProject is binary, indicating it is a .NET module. If you do not see your module, you know something has gone wrong with the installation.

Now it is much easier to import your cmdlets. You no longer need to figure out the relative path or keep track of a potentially long absoulte path. You can simply use the name of the module’s folder. When first implementing, I like to import the module with the Verbose flag to ensure that I get what I am expecting:
PS C:\Users\csvingen> Import-Module MyNewProject -Verbose
VERBOSE: Importing cmdlet 'Get-Something'.

Testing and Debugging

There are two important thing to be aware of when it comes to debugging your compiled modules. The first is that re-importing the module into your existing session will not bring in changes that you have made. You need to remove the modules first:
Remove-Module MyNewProject
Second, you will not be able to build your module in Visual Studio once you have imported the module. PowerShell will maintain a lock on the file until you unload your session.

I like to write a Test.ps1 script, that I load in the PowerShell ISE, for testings:
Import-Module .\bin\Debug\MyNewProject.dll
Get-Something
Remove-Module MyNewProject
Notice that the import uses the relative path in this case, since installing it is reserved for a completed project. Also note that you import with a path, but remove with just the module name.


Since this post has become a lot longer that I was expecting, I am going to split it in two and demonstrate Advanced Functions in the next installment.

Thursday, July 31, 2014

Getting Started with PowerShell Modules and Advanced Functions

Jumping into PowerShell after years of Linux shell scripting can leave a person feeling a little lost. In some ways I feel that Microsoft did everyone a disservice by giving such a wide array of options to organize your code.

In Bash, for example, you basically write scripts. Scripts glue together compiled applications and other scripts. Sure you can write functions and import them by “dot sourcing” them, but that is reserved for special cases like login scripts and things like advanced screen configuration. If you want a script available everywhere, you put it in your ~/bin directory and call it a day.

When it comes to PowerShell there are so many options and conflicting ways of doing things that it can be paralyzing. One wonders why there are so many ways, what the differences are, and what is the right way. For example:

  • You can write scripts
  • You can write functions and put them in script files then, like Bash, dot source them
  • You can write .NET cmdlets, and
  • Since v2 you can write “advanced functions” (aka script cmdlets)

Then there are these things called Modules. Are modules dlls or scripts? They can be both. Finally there is the question of where these things all go and how do you get them into your session?

Now I am definitely not an expert on the subject, but this is how I view things:

  • Scripts are where you glue together command line programs and cmdlets. The output is usually text and they are usually run from the prompt (not other scripts, cmdlets, etc…)
  • Forget about writing functions and dot sourcing them
  • .NET cmdlets are program fragments that you write when you want to interact with something that only exposes a .NET api. They should be fairly stable and not something that you would want other devs on your team, or elsewhere, to modify. When you compile them into a dll, they become a module.
  • Advanced functions are program snippets that you want to glue together with scripts. This is where you write isolated reusable code. Advanced functions can be packed into a module by putting them into a text file with a .psm1 extension.

Essentially, .NET cmdlets are compiled C# code that interacts with .NET and are hard to change. Advanced functions are cmdlets written in the PowerShell programming language, predominantly interact with other PowerShell components, and are slightly easier to modify and deploy.

Next I will run through creating these things and working with them.

Wednesday, July 30, 2014

Exploring PowerShell cmdlets

I have been working with PowerShell for a number of years now. In that time I have generally only created scripts (like you would in Bash) and build scripts, using the awesome Psake build tool.

I never had a need to create a module, advanced function, cmdlet or any of the other fancy features that PowerShell supports.

However, today I began looking at interaction with the Octopus Deploy server. At work we have a large number of variables that we need to create and maintain. The web interface is not bad, but it does not allow bulk edits. After searching for a way to import variables, perhaps via a CSV file, I found no such feature exists.

The entire backend of Octopus is accessible through a REST api, so I started looking at editing JSON and PUTting it to the server, but that seemed cumbersome. Then I came across the Octopus.Client C# library. It is a .NET api over the REST api.

First I thought about writing a command line tool or adding the functionality to their octo.exe command line tool. But the type of interaction I was looking for called for a more interactive shell-type experience than a command line tool gives. So I started to think about writing a REPL type tool, when I realized that PowerShell already gives you all the good parts of the infrastructure. What I needed was a set of shell scripts. Given that the api is .NET, it became obvious that PowerShell cmdlets were I what I was after.

Both the System.Management.Automation and Octopus.Client apis are really straightforward to use. It didn’t take long to get a good collection of cmdlets together. Hence, Octopus-Cmdlets was born.

Tuesday, July 29, 2014

PowerShell Oddities Take 2

As I said yesterday, PowerShell does have its warts. Here’s another oddball one:

Windows PowerShell
Copyright (C) 2009 Microsoft Corporation. All rights reserved.

PS C:\Users\Swoogan> $str = ""
PS C:\Users\Swoogan> $result = mkdir temp
PS C:\Users\Swoogan> $result


    Directory: C:\Users\Swoogan


Mode                LastWriteTime     Length Name
----                -------------     ------ ----
d----        28/07/2014   7:11 PM            temp


PS C:\Users\Swoogan> $out = $str.GetType(), $result
PS C:\Users\Swoogan> $out

IsPublic IsSerial Name                                     BaseType
-------- -------- ----                                     --------
True     True     String                                   System.Object

PSPath            : Microsoft.PowerShell.Core\FileSystem::C:\Users\Swoogan\temp
PSParentPath      : Microsoft.PowerShell.Core\FileSystem::C:\Users\Swoogan
PSChildName       : temp
PSDrive           : C
PSProvider        : Microsoft.PowerShell.Core\FileSystem
PSIsContainer     : True
Name              : temp
Parent            : Swoogan
Exists            : True
Root              : C:\
FullName          : C:\Users\Swoogan\temp
Extension         :
CreationTime      : 28/07/2014 7:11:17 PM
CreationTimeUtc   : 29/07/2014 1:11:17 AM
LastAccessTime    : 28/07/2014 7:11:17 PM
LastAccessTimeUtc : 29/07/2014 1:11:17 AM
LastWriteTime     : 28/07/2014 7:11:17 PM
LastWriteTimeUtc  : 29/07/2014 1:11:17 AM
Attributes        : Directory
BaseName          : temp
Mode              : d----


PS C:\Users\Swoogan>

If you output the System.IO.DirectoryInfo on it’s own, it uses one formatter; however, if you output it with a System.Object, then a different formatter is used. The real trouble is when you have this happen in a 100 line long script where the System.Object gets added to the pipeline on line 2 and the mkdir occurs on line 92. Your script’s output changes drastically because of some code 90 lines away.

You can prevent it by capturing the System.Object in a variable or piping it to Out-Null. If you actually want to output it, you can pipe to Out-Default. Although I’m not exactly sure why the later works.

All three options are a minor frustration as you basically have to do them all the time on the off chance something you’re doing now is going to change the output of the script somewhere down the road.

Monday, July 28, 2014

PowerShell Oddities

On the whole I quite like working with PowerShell, but there sure are some weird quarks that you stumble upon from time to time. In general, the object passing model is pretty neat. At times it’s so much more powerful than Linux’s text passing model. However, there are times where it’s just infuriating. For example, when you so soomething like:

PS C:\Users\Swoogan> Import-Module WebAdministration
PS C:\Users\Swoogan> $apps = Get-WebApplication
PS C:\Users\Swoogan> $apps

Name             Application pool   Protocols    Physical Path
----             ----------------   ---------    -------------
WebServices      DefaultAppPool     http         C:\Temp
Admininistration DefaultAppPool     http         C:\Temp

PS C:\Users\Swoogan> $apps[0].Name
PS C:\Users\Swoogan> 

See, what it looks like you got was a collection of Web Application objects, but what you really got was a collection of XML Nodes:

PS C:\Users\Swoogan> $apps | Get-Member

   TypeName: Microsoft.IIs.PowerShell.Framework.ConfigurationElement#site#application

Name                     MemberType            Definition
----                     ----------            ----------
ClearLocalData           Method                System.Void ClearLocalData()
Copy                     Method                System.Void Copy(Microsoft.IIs.PowerShell.Framework.ConfigurationElem...
Delete                   Method                System.Void Delete()
Equals                   Method                bool Equals(System.Object obj)
GetAttribute             Method                Microsoft.IIs.PowerShell.Framework.ConfigurationAttribute GetAttribut...
...
Schema                   Property              Microsoft.IIs.PowerShell.Framework.ConfigurationElementSchema Schema ...
PhysicalPath             ScriptProperty        System.Object PhysicalPath {get=$pquery = $this.ItemXPath + "/virtual...

Granted, this is not really an issue with PowerShell. It has more to do with the module’s authors than the system, but it’s still par for the course when using PowerShell.
Another one that’s got me a few times is this:

PS C:\Users\Swoogan> Get-ItemProperty "IIS:\AppPools\ASP.NET v4.0" -name managedPipelineMode
Integrated
PS C:\Users\Swoogan> Set-ItemProperty "IIS:\AppPools\ASP.NET v4.0" -name managedPipelineMode -value Integrated
Set-ItemProperty : Integrated is not a valid value for Int32.
At line:1 char:17
+ Set-ItemProperty <<<<  "IIS:\AppPools\ASP.NET v4.0" -name managedPipelineMode -value Integrated
    + CategoryInfo          : NotSpecified: (:) [Set-ItemProperty], Exception
    + FullyQualifiedErrorId : System.Exception,Microsoft.PowerShell.Commands.SetItemPropertyCommand

I don’t even know what to say about that!

Saturday, February 1, 2014

Disk Partition Setup

When I bought my new computer I decided early on that I wanted to create a hybrid disk solution. Having the OS and apps on an SSD was a given but I also wanted to have a large scratch space for rendered video frames, virtual machines and games. That meant buying a conventional hard drive. Since Linux has flexible partitioning, and SSDs last longer with fewer writes, there was an opportunity to optimize things.

First I created GPT disk labels on each drive. On the SSD I created two partitions: one for boot and a second for lvm. Note that I left some room free on the ssd for TRIM and made sure the partitions were aligned. On the HDD I created one partition for lvm. The volume groups were appropriately labeled ssd and hdd.

In the ssd volume group I created two logical volumes: root and home. In the hdd volume group I created the following volumes: var, data (the big scratch space) and swap.

Putting /var on a HDD is recommended because there tends to be a lot of writes. Var stands for variable, after all.

Here is the final configuration:

disk 1 (ssd):
  gpt partition label:
    /dev/sda1: 0% - 512MB ext2 (no journalling required) /boot
    /dev/sda2: 512MB - 80%  lvm
      ssd logical volume:
    /dev/ssd/root: 15GB     ext4    /
    /dev/ssd/home: 150GB    ext4    /home

disk 2 (hdd*):
  gpt partition label:
    /dev/sdb1*: 0% - 66% lvm    
      hdd logical volume:
    /dev/hdd/swap:  4GB swap    swap
    /dev/hdd/var:   10GB    ext4    /var
    /dev/hdd/data:  600GB   ext4    /mnt/data

I also did a couple more tweaks along the same lines. I configured /tmp to be mounted in memory, sym-linked Chrome’s cache directory to be in /tmp and changed Firefox’s browser.cache.memory.enable to true and browser.cache.disk.enable to false.

Honestly, I am not sure that all of this was really necessary, but it is done and I had fun doing it.

* Those labels are not 100% true. More on that in later.

Sunday, December 15, 2013

Ksshaskpass Broken

Before I replaced my old computer, I had an odd thing happen with ksshaskpass. Suddenly it seemed to stop retreiving the passphrase from kwallet. I first noticed a problem with kwallet misbehaving. It began to appear as though there was no wallet in kwalletmanager. Then I noticed problems with Chrome auto-filling passwords and ssh started asking for the passphrase for my private key. For awhile I thought something was wrong with kwallet. I tried deleting my wallet and recreating it, and a few other things. After searching and not finding anyone having similar problems I gave up and resigned myself to the idea that I would just reinstall Kubuntu when I got my new computer. I recently tried to set ksshaskpass up on my new computer and immediately saw the same issue. I have also noticed it in my VM and laptop, both running Kubuntu.
Finally, after logging in and looking through the processes, I found the following:
2009  /bin/sh /home/swoogan/.kde/Autostart/ssh-askpass.sh 
2017  /usr/bin/ssh-add 
2024  /usr/bin/ksshaskpass Enter passphrase for /home/swoogan/.ssh/id_rsa:
It seems as though ksshaskpass is asking for the passphrase on stdin instead of retreiving it from kwallet. I still have not found a resolution to the issue, but for the mean time I have disabled my script from running at startup. To do that I ran:
mv .kde/Autostart/ssh-askpass.sh ~/
Now I just run the script ~/bin/askpass.sh manually, after logging in. I am sure that it is some sort of timing issue. It is something that is a result of a semi-recent change, because the same thing used to work before.