Wednesday, September 10, 2014

Azio L70 Keyboard Linux Driver, The Setup

Introduction

In parallel with reverse engineering the keyboard protocol I began to investigate how to implement a USB driver for Linux. I assumed that someone had already written a blog post about it and I could just follow their instructions. While there are a few out there, there are not as many as you would think.

The first thing that you will find when searching for how to write a USB driver is that there are two types, kernel mode and user mode. Many USB devices can be operated in user mode. Things like cameras, dart guns, fans, etc… are all candidates. Keyboards on the other hand, not so much. Well, as long as you like to use your keyboard for things like booting, operating grub, logging in, and whatnot.

Most of the information out there points you in the direction of making a user mode driver. When you find someone asking how to implement a USB driver they are quickly steered in the direction of writing a user mode one. Which is great for them, as they are much simpler to implement but not great if you really need to implement a kernel level driver.

Linux USB Drivers

I realized that I was going to have to dig deeper and really understand how USB in general works and specifically how USB drivers work at the kernel level. Thankfully there is a terrific resource for that. Do not be put off by its age, it is still very relevant:

Programming Guide for Linux USB Device Drivers By Detlef Fliegl

Not a very inspired title but you have to love it when people get to the point.

I read the entire document. It really demystifies a lot of the aspects of USB. In particular, the most important part is section 2 where it explains the device driver framework and the data structures used.

Along with Detlef’s document, I used Matthias Vallentin’s excellent blog post on Writing a Linus Kernel Driver for an Unknown USB Device from 2007. I have to say, re-reading his article for this blog post makes me feel like I have a long way to go in terms of blogging skills. In spite of the fact that Matthias was writing a driver for a dart gun, and I a keyboard, he clearly has a deeper understanding of the underlying driver mechanics.

Some similar information can be found in the Linux Magazine article Writing an Input Module and Michael Opdenacker’s slides on Linux USB drivers.

Since I predominantly learn by example, it was time to dig into some code. This truly is the beauty of open source. I cannot imagine trying to do something like this in a closed source ecosystem.

Getting Started


Development Environment

First, I set up Kubuntu in a VirtualBox VM. I was worried that I might make a mistake with the driver and bring my whole machine down, so isolating it in a VM seemed prudent. Next I connected a second keyboard to my system. That way when I passed the Azio keyboard through to the guest OS I would still be able to interact with the host machine.

To start, I downloaded the Linux source code to my development machine. The command on Kubuntu is:

apt-get source linux

This will download the kernel source to the current working directory and apply all of Ubuntu’s patches.

You also need to make sure you have all the build tooling installed. Nowadays it comes down to a single command:

sudo apt-get build-dep linux-image-`uname -r`

I then began spelunking around the kernel source code. The drivers directory seemed like a good place to start. Indeed, I found two files in particular that were instrumental in getting my own driver implemented. The first is the generic USB keyboard driver found at drivers/hid/usbhid/usbkbd.cand the second is the Sega Dreamcast keyboard driver found at drivers/input/keyboard/maple_keyb.c

Digging into the Existing Drivers

I found a kernel function called printk that allows you to write messages from the driver. I littered the existing usbkbd driver with printk statements to figure out where and what I would need to change in order to get the keyboard working. The messages are available from the dmesg command. On Kubuntu they are also written to /var/log/dmesg so I was able to load the driver, run

tail -f /var/log/dmesg

and watch for the debugging statements.

Compiling the Existing Driver

The real trick was compiling the little bugger. I did not want to build the entire kernel as that is very time consuming (and unnecessary). I did not even want to build all the drivers, or hid drivers. I just wanted to build the usbkbd.c driver and load it. After a lot of searching I found that you can build it with the following command:

make modules SUBDIRS=drivers/hid/usbhid

Sweet, just the one sub directory! Just load the module with:

sudo insmod drivers/hid/usbhid/usbkbd.ko

And promptly get the following error:

insmod: error inserting ‘usbkbd.ko’: -1 Invalid module format

After lots and lots and lots of searching, with a bunch of red herrings thrown in, I found that it is not really the wrong format, it is just that the version of my precompiled kernel and the version of the module were not in sync. I found the solution in the Kernel Module Programming Guide, section 2.8 Building modules for a precompiled kernel. I needed to add Ubuntu’s version suffix. In my cases I was running patch 56 with the generic kernel, so I had to add EXTRAVERSION=-56-generic

With that problem solved I could, for the first time, load a kernel module with my edits and peer into its inner workings. I began making rapid edits whereby I was unloading, compiling, and re-loading the module in rapid succession. I created a script in the root of the Linux source tree, called rebuild, with the following contents:

#!/bin/sh

make EXTRAVERSION=-56-generic modules SUBDIRS=drivers/hid/usbhid 0=~/linux-3.2.0
sudo rmmod usbkbd
sudo insmod drivers/hid/usbhid/usbkbd.ko

*the 0= just points to the root of the Linux source tree

Do not forget to chmod +x ./rebuild to make it executable.

Understanding the Generic Driver

Generic driver, usbkbd.c, from the Linux kernel source.

The function where the magic happens is static void usb_kbd_irq(struct urb *urb). It is executed with every USB interrupt (see my previous post in this series for a more detailed description of USB interrupts). The urb struct is the USB Request Block and it holds all the information about the keypress (in this case). The function first checks the status of the URB. There are several statuses upon which it simply returns. Once that gate is cleared, the actual key code handling is executed.

The driver stores the interrupt’s key codes in the URB’s context pointer. There are two byte arrays new and old that hold the current and previous key codes, respectively. At the beginning of function the urb->context pointer is copied to the local variable kbd.

struct usb_kbd *kbd = urb->context;

All of the keycodes are stored in a 256 byte array, usb_kbd_keycode, declared earlier in the driver. Finally, input.h includes a function to report the keycode the kernel called input_report_key. The first argument is the keyboard device pointer, the second is the keycode and the third is either a 1 or 0 depending if the key is down or up.

The driver contains two loops that execute to determine the key codes and their states. The first loop, uses a neat little C trick that I employed too: (kbd->new[0] >> i) & 1It takes the first byte in the keycode, bit shifts it by 0 through 7 and masks the result with 1. If the mask results in a 0 the key is up and 1 it is down, so it just reports that to the kernel. The actual keycodes in the array are offset by 224, so it adds that to i when indexing usb_kbd_keycode. These keys represent the modifiers keys like Alt and Ctrl.

for (i = 2; i < 8; i++) {
 if  (kbd->old[i] > 3 && memscan(kbd->new + 2, kbd->old[i], 6) == kbd->new + 8) ...
  input_report_key(kbd->dev, usb_kbd_keycode[kbd->old[i]], 0); ...
 if (kbd->new[i] > 3 && memscan(kbd->old + 2, kbd->new[i], 6) == kbd->old + 8) ...
  input_report_key(kbd->dev, usb_kbd_keycode[kbd->old[i]], 1); ...
}
The last part of the function copies the incoming keycode into the old array for the next iteration.
 
memcpy(kbd->old, kbd->new, 8);
Once I had a firm understanding of how the existing driver worked, I was able to implement my own. I will cover that in the next and final post in this series.

Wednesday, September 3, 2014

Reverse Engineering the Azio L70 Keyboard Protocol

To recap, I bought an Azio L70 Gaming Keyboard and discovered it did not work with Linux. I set out write a kernel driver for it; starting by capturing the usb packets with usbmon and WireShark.

When I finally figured out where the actual key-codes were in the packets it was not very hard to figure out the pattern. I had both a standard usb keyboard (that functioned in Linux) and my new L70 both attached to my computer. I could strike keys on either and watch the different patterns.

The Left Over Data portion of the usb packets were 16 hex digits long (8 bytes). The regluar keyboard sent packets like so:

a -> 00 00 00 00 00 00 00 01
b -> 00 00 00 00 00 00 00 02
c -> 00 00 00 00 00 00 00 03
d -> 00 00 00 00 00 00 00 04

The Azio was sending packets like this:

a -> 04 00 01 00 00 00 00 00
b -> 04 00 02 00 00 00 00 00
c -> 04 00 04 00 00 00 00 00
d -> 04 00 08 00 00 00 00 00

Once the pattern became obvious, so did the reason why the keyboard requires a device-specific driver. In fact, there was a hint right on the packaging. The L70 is billed as a gaming keyboard with “n-key rollover”. Not only that, but this rollover functioned over USB.

When I bought the keyboard and started on this little endeavor I did not even know what rollover was, let alone n-key rollover. For those not in the know, I will attempt to explain.

First a little history lesson…

At one time, PCs used a port called PS/2 for keyboard and mouse input. The PS/2 port used a BIOS-based interrupt mechanism to report key-presses to the system. When at key was pressed the keyboard interrupted the computer with the key code. If you smashed down 10 keys, the keyboard, insomuch as it had internal buffer to maintain the information, would dutifully report each key as unique sequential interrupt. Therefore, all keyboards had n-key rollover, or the ability to press N keys at once and have the OS receive them correctly.

Then came USB keyboards and mice. USB is still a serial protocol but unlike PS/2 it is a polling-based protocol. Rather than being interrupted by the device, the OS is responsible for constantly checking the bus to see if there is any information on it. This causes problems for rollover, aka multiple key-presses, on USB keyboards. What happens is that the key presses can pile up, and in fact, essentially change. At least that is my understanding. For example, take the keyboard input above. Key A sends a key code of 1. B and C send 2 and 3 respectively. Therefore, pressing A and B simultaneously might cause the system to see a 3 (or C) rather than the separate key presses.

The only way to work around this limitation is to write a different protocol. One where every key-press is unique and no combination of keys will produce another key’s code. This is exactly what Azio did. The 1,2,4,8,… pattern seen above is obvious to anyone familiar with bit masking.

Other companies take another approach. They include a PS/2 converter and advertise their product as having, most typically, 6 key rollover on USB and n-key rollover on PS/2 (with the adapter). This is the route that both DAS and Code took. Consequently they work with Linux and the standard USB keyboard driver.

One thing that still bugs me is that I never determined how it was that the keyboard functioned as much as it did. Why, when it was giving so different of input, did the vast majority of keys function? Remember, it was only the Ctrl, Alt and Meta (Windows) keys that did not operate.

Once I had the protocol reverse engineered it was then a matter of writing a Linux USB device driver. I will cover that in a later post.

Friday, August 22, 2014

Capturing the Azio Keyboard Data

By the time I had replaced every component of my computer, including the mouse, I thought hey, why not the keyboard too? As I mentioned in the first part of this series of posts, I got an Azio L70 Gaming Keyboard. The last thing I expected was for it to not work on Linux. To be honest, it did not even occur to me that might be a possibility. I scrutinized every single piece of hardware I bought for my new computer, making sure they would all place nice with Kubuntu, except the keyboard.

Mistakenly I thought all keyboards used a standard protocol. Although, the device reported itself as a standard HID compliant device, the Linux usbhid driver was not receiving all key-presses. In particular the Ctrl, Alt and Meta (Windows) keys did nothing.

After verifying on Azio’s website that Linux really was not supported, I made the decision to attempt to write a driver for it. The first step toward my goal was reverse engineering the protocol. Again, it clearly was not standard, so what was it?

In order to understand what was going on I needed some way to read the raw I/O that was going over the USB bus. After a brief bit of searching, I found out that with the usbmon driver, Wireshark can do just that.

See: http://macgyverque.net/2012/12/03/monitoring-usb-traffic-using-wireshark-under-linux/

There were a few hoops to jump through in order to get things to work. First, ensure that you have the usbmon kernel module installed. I will leave it as an exercise for the reader to determine the specific instructions for their distro. You will also need to insert the module into the kernel, if it is not by default. On Kubuntu I ran:

$ lsmod | grep usbmon
$ sudo modprobe usbmon

When you first run Wireshark you will not see any interfaces to capture. You need extra priviledges to do that. This makes sense since you are accessing the hardware at a pretty low level and could read other users’ io. So close it down and run:

$ sudo wireshark

You will get an error right off the hop, and a tip about running as an unpriviledged user (I am guessing they disable lua as it is a programming language and we all know what happens when you run macros as a superuser, *cough* MS Office *cough*)

Lua Error

Unless you are going to do a lot of capturing, you can do what I did and just ignore the error. At which point, you will get the next dialog, this time a warning:

I am sure there *is* a better way. But reading a doc would take time and I have got better (and more fun) things to do.

[Aside: they need to sick a UX designer on these dialogs. They are all messed up]

Now you can actually start a capture. You do this by going to the Capture menu and clicking the Interfaces option. This will bring up ridiculously sized dialog that you will first have to make bigger (every time!). Once that annoyance is out of the way, you will see all of your usb and network interfaces. There are often many usb interfaces and it can be a little tricky to find which is the device you are looking for. Basically you will want to interact with the device and watch the Packets column on the dialog. You might have to try a couple, but basically you are looking for the one who’s packet count goes up while using the device in question.

Finding the right usbmon interface

When you have narrowed it down to an interface you want to try, just click the start button and that will begin the capture process.

Now the fun part begins.

The hardest part of this whole process was figuring out which of the various packets had the info I was looking for. First, because driver responds back the the keyboard with each keypress, you have to figure out who’s who. In other words, which packets are from the keyboard and which are from your computer. Once that is sorted out, you have to figure out which packets the keyboard are sending have the keypresses in them (there are a bunch of control packets in the mix) and finally you have to find out what part of the packet has the code for the key that was pressed.

Example usbmon capture

I am a little embarrassed to think how much time it actually took me. Once I had it figured out, it seemed so obvious, but for some reason I just was not picking up on the pattern at first. Everything I needed was in the Leftover Capture Data field.

Once I had narrowed down where in the packet the key code was I began the tedious process of clicking each and every key on the keyboard and figuring out the keycode pattern. Additionally, I had to decypher the system for the Caps, Num and Scroll locks and their associated LEDs. They are slightly different because the driver must maintain the state of each lock and signal that back to the keyboard.

How I did all that will be covered in the next post.

Thursday, August 14, 2014

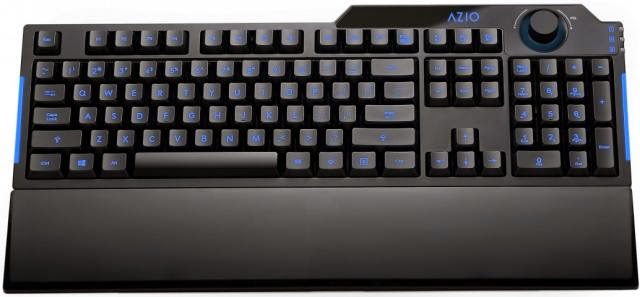
Azio Keyboard

When I bought my new computer, I slowly but eventually replaced every component. With each new component I got, another suddenly seemed in need of replacing. When all was said and done, I had replaced everything but my keyboard. On one last shopping trip I figured why not finish the job and get a keyboard too?

For about a year I have been looking into mechanical keyboards and questioning if I should buy one. A lot of people say that if you are going to use it to interface with the computer constantly, it is worth spending top dollar on a keyboard. However, the $100+ price tags have always scared me off. Especially when you can get a Logitech special for $9.

I have been eyeing up the Das Keyboard and the Code. I particularly like the Code 87 key model. With the built-in keyboard tray on my desk, when I am sitting center to the desk, the keyboard is actually offset slightly left to make room for my mouse. Without the numpad, which I do not use very often, I could center the keyboard with my body. Unfortunately, these keyboards are very expensive, are almost always sold out, and have limited availability in Canada. Finally, I only use the computer at home for a few hours a day.
Nice narrow keyboard

Following my typical methodology, I go to http://ncix.ca and compare what is on sale that week. I decided to get a higher end non-mechnanical keyboard. I really wanted something with media keys, or the like, because when I have my headphones on for gaming, I have no way to control the volume when a game is full-screen. I ended up settling on the Azio L70 Gaming Keyboard for a really good price.

Azio L70

I got to tell you, I really like this keyboard. It is a lot better than the Logitech $9 specials. It is way heavier and more sturdy. It stays in place nicely. The keys have a much better feel and they press and respond like no other keyboard I have used. I immediately felt like I could type faster on it.

There was just one little problem… This keyboard does not work on Linux. The volume knob (which I love) and the standard keys all work, but the ctrl, meta, alt and menu keys all do nothing. After searching their website, it was confirmed. They do not support Linux at all.

It was not going to be worth it to send it back. Worst case scenario, I would take it to work and use it on my Windows machine. But I thought, what if just maybe, I could write a driver for it? I have never written a Linux driver, or worked with USB, or written in C, but how hard could it be?

Wednesday, August 6, 2014

PowerShell Oddities, Take 3

I ran into a weird problem today. I was banging my head against the wall for a little while before I kind of figured out what is going wrong and how to fix it. If you are like me, you would expect the following code to create an array with two strings:

$foo = "Test"
[string[]] @($foo + "_Suffix1", $foo + "_Suffix2")

It even looks like it does. The output is:

Test_Suffix1 Test_Suffix2

But look again. Let’s index into the array:

$foo = "Test"
[string[]] @($foo + "_Suffix1", $foo + "_Suffix2")[0]

As you can see it is both elements concatenated together, not two elements:

Test_Suffix1 Test_Suffix2

I fixed it by change the code to the following:

$foo = "Test"
[string[]] @("$foo`_Suffix1", "$foo`_Suffix2")

Here the output is different, and correct:

Test_Suffix1
Test_Suffix2

Again, if we index into the array:

$foo = "Test"
[string[]] @("$foo`_Suffix1", "$foo`_Suffix2")[0]

Output:

Test_Suffix1

Here is the part that really threw me off:

$foo = "Test" 
([string[]] @($foo + "_Suffix1", $foo + "_Suffix2")).GetType() 
([string[]] @("$foo`_Suffix1", "$foo`_Suffix2")).GetType()
IsPublic IsSerial Name                                     BaseType
-------- -------- ----                                     --------
True     True     String[]                                 System.Array

IsPublic IsSerial Name                                     BaseType
-------- -------- ----                                     --------
True     True     String[]                                 System.Array

You are getting your array.

That made it hard to figure out because the code was actually buried deep in a sequence of calls. In the former, you get an array with everything stuffed into the first element. In the latter, you actually get two elements.

What is really interesting is that given the above, you would think the following would be the same as the code that worked, but in fact it acts like the failing code:

$foo = "Test" 
[string[]] @($foo + "`_Suffix1", $foo + "`_Suffix2")[0]

Output:

Test_Suffix1 Test_Suffix2

Clearly what I think is going on, is not. Let’s dig in a little further…

See, I was assuming that the _ was throwing the concatenation off somehow. Which stands to reason when you try something like this:

$foo = "Test" 
[string[]] @("$foo_Suffix1", "$foo_Suffix2")

In which case, the string parser sees those as all one variable.

Let’s try the original with some extra braces:

$foo = "Test"
[string[]] @(($foo + "_Suffix1"), ($foo + "_Suffix2"))

Output:

Test_Suffix1
Test_Suffix2

A little more experimentation:

PS C:\> [string[]] @("asfsadf", "asfdsdf")
asfsadf
asfdsdf
PS C:\> [string[]] @("asdf" + "asfsadf", "asfdsdf")
asdfasfsadf asfdsdf

So, PowerShell concatenation changes the meaning of the comma. This is going to require further investigation. My hunch is that the + takes precedence over the , and what you are actually doing is passing an array to the concatenation operator.

In other words, what I think is going on is:

[string[]] @(("asdf" + "asfsadf"), "asfdsdf")

But what is actually going on:

[string[]] @("asdf" + ("asfsadf", "asfdsdf"))

Definitely something to be aware of.

Tuesday, August 5, 2014

Getting Started with PowerShell Modules, Part 2

Modules

Just to recap, modules are the key to organizing you PowerShell code in a logical way. There are two ways to write modules:

  • .NET assemblies
  • PowerShell advanced functions

Which you use depends on what components you are interacting with and how easily you want your end users to be able to modify the finished product. In the last post, I covered .NET assemblies. In this post I will cover Advanced Functions.

Creating a PowerShell Advanced Function

PowerShell advanced functions are sometimes called script cmdlets and for good reason. Once you have created a .NET cmdlet, the pattern will be familiar.

function Verb-Noun {
    <#
        .SYNOPSIS
        Describe the function
        .DESCRIPTION
        Describe the function in more detail
        .EXAMPLE
        Give an example
        .EXAMPLE
        Give another example
        .PARAMETER ParameterName
        Describe the parameter here
    #>
    [CmdletBinding()]
    param (
         [Parameter(Mandatory=$True,
            ValueFromPipeline=$True,
            ValueFromPipelineByPropertyName=$True,
            HelpMessage='Some descriptive text here')]
        [string] $parameterName
    )

    begin { }
    process { }
    end { }
}

Of course, the begin, process and end correspond to BeginProcessing, ProcessRecord and EndProcessing methods, respectively. And that is it. Pretty straightforward.

Packaging an Advanced Function into a Module

Name the text file, that you wrote the advanced function in, with a .psm1 extension and place it in a directory of the same name. Seriously, that is it.

For example,

MyNewModule\MyNewModule.psm1

Importing Script Modules

Modules can be imported in the same three ways that scripts can be run: relative reference, absolute reference and by placing it in your path. However, the third is slightly different for modules than scripts.

Relative Reference

PS C:\SourceCode> Import-Module .\MyNewProject

Note that the actual .psm1 file is located in the MyNewProject folder. You do not need to specify it.

Absolute Reference

PS C:\SourceCode> Import-Module C:SourceCode\MyNewProject

Again, you do not specify the script itself, in the path.

Installing it in your Module Path

First, verify your module path by running the following:

PS C:\> $env:PSModulePath
C:\Users\swoogan\Documents\WindowsPowerShell\Modules;C:\Windows\system32\WindowsPowerShell\v1.0\Modules\

The first path is specific to your logged in user. The second is a system wide path available to all users. Any additional paths may have been installed by third parties.

This leads to two possible options for you to install your module. You can either put it in a directory already present in your PSModulePath, or you can create a new location and add it to your path. I recommend using what is already there.

Here is an example of performing the installation:

PS C:\> $path = Join-Path -Path $env:PSModulePath.Split(';')[0] -ChildPath MyNewProject
PS C:\> mkdir $path

    Directory: C:\Users\csvingen\Documents\WindowsPowerShell\Modules

Mode        LastWriteTime      Length  Name
----        -------------      ------  ----
d----       8/1/2014   1:24 PM         MyNewProject

PS C:\> Copy-Item .\SourceCode\MyNewProject\* $path -Verbose
VERBOSE: Performing operation "Copy File" on Target "Item: C:\SourceCode\MyNewProject\MyNewProject.psm1
Destination: C:\Users\swoogan\Documents\WindowsPowerShell\Modules\MyNewProject\MyNewProject.psm1".

To make sure that you have installed your module correctly, run the following:

PS C:\> Get-Module -ListAvailable

    Directory: C:\Users\csvingen\Documents\WindowsPowerShell\Modules


ModuleType Name                                ExportedCommands
---------- ----                                ----------------
Script     MyNewProject                        {Verb-Noun}
Binary     Swoogan                             {Find-InFiles, grep}

...

Notice that the type of MyNewProject is script, indicating it is a script module and not a binary .NET module.. If you do not see your module, you know something has gone wrong with the installation.

Now it is much easier to import your cmdlets. You no longer need to figure out the relative path or keep track of a potentially long absolute path. You can simply use the name of the module’s folder. When first implementing, I like to import the module with the Verbose flag to ensure that I get what I am expecting:

PS C:\Users\csvingen> Import-Module MyNewProject -Verbose
VERBOSE: Importing cmdlet 'Verb-Noun'.

Testing and Debugging

There is one important thing to be aware of when it comes to debugging your script modules: re-importing the module into your existing session will not bring in changes that you have made. You need to remove the modules first:

Remove-Module MyNewProject

I like to write a Test.ps1 script, that I load in the PowerShell ISE, for testings:

Import-Module .\MyNewProject
Verb-Noun
Remove-Module MyNewProject

Notice that the import uses the relative path in this case, since installing it is reserved for a completed project. Also note that you import with a path, but remove with just the module name.

Friday, August 1, 2014

Getting Started with PowerShell Modules, Part 1

Modules

Modules are the key to organizing you PowerShell code in a logical way. There are two ways to write modules:
  • .NET assemblies
  • PowerShell advanced functions
Which you use depends on what components you are interacting with and how easily you want your end users to be able to modify the finished product.

Creating a .NET PowerShell Module

I really have to commend Microsoft one this. Creating a new .NET cmdlet module is trivial. Contrary to the convoluted hoops you have to jump through to do something things in .NET it is a refreshing change.
Here are the steps:
  1. Create a new Class Library in your favourite language.
  2. Target the correct .NET Framework version for the PowerShell version you want to support.
  3. Reference the System.Management.Automation assembly.
  4. Derive a class from Cmdlet or PSCmdlet and decorate it with a Cmdlet attribute.
Here is a table showing how the framework versions correspond to the PowerShell versions:
PowerShell v2PowerShell v3PowerShell v4
.NET 3.5.NET 4.0.NET 4.5
If you are not sure what version of PowerShell you are running, you can find out by running the following command:
PS C:\> $PSVersionTable.PSVersion

Major  Minor  Build  Revision
-----  -----  -----  --------
3      0      -1     -1

Details

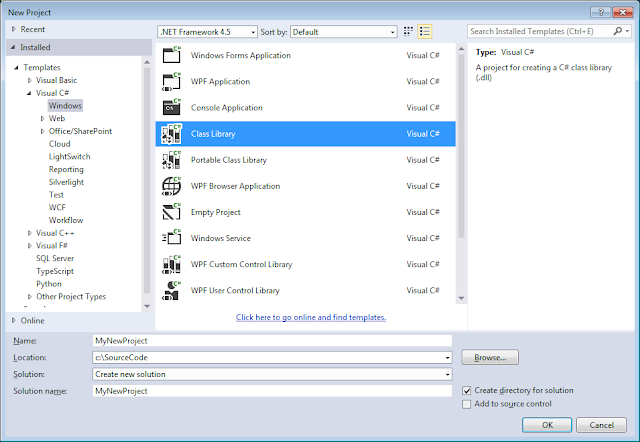
Step 1: Create the Project
Select File->New->Project… from the Visual Studio menu.
New Project

Step 2: Target the Framework
Right-click the project and select Properties. Select the appropriate framework version from the Target framework dropdown.
Target Framework

Step 3: Add the Assembly Reference
Right-click the project references. Select Add Reference and browse to
C:\Program Files (x86)\Reference Assemblies\Microsoft\WindowsPowerShell\

Then browse into the appropriate subfolder for your version. For me that was 3.0. Select System.Management.Automation.dll and click the Add button.
Assembly Reference
Step 4: Create an Derived PSCmdlet Class
The basic skeleton follows:
using System;
using System.Management.Automation;

namespace Namespace
{
    [Cmdlet(VerbsCommon.Get, "Something")]
    public class GetSomething : PSCmdlet
    {
        [Parameter(
            Mandatory = true,
            Position = 0        
            )]
        public string Name { get; set; }

        protected override void BeginProcessing()
        {
            base.BeginProcessing();
        }

        protected override void ProcessRecord()
        {
            base.ProcessRecord()
        }

        protected override void EndProcessing()
        {
            base.EndProcessing();
        }
    }
}
That is it. The BeginProcessing and EndProcessing are not required. So a really simple cmdlet would like this:
using System;
using System.Management.Automation;

namespace Namespace
{
    [Cmdlet(VerbsCommon.Get, "Something")]
    public class GetSomething : PSCmdlet
    {
        [Parameter(
            Mandatory = true,
            Position = 0        
            )]
        public string Name { get; set; }

        protected override void ProcessRecord()
        {
            WriteObject(Name);
        }
    }
}
Once you compile your project into an assembly, you have created your first PowerShell module. To use the module, you need to import it.

Importing .NET Modules

Modules can be imported in the same three ways that scripts can be run, relative reference, absolute reference and by placing it in your path. However, the third is slightly different for modules than scripts.

Relative Reference
PS C:\SourceCode> Import-Module MyNewProject\bin\Debug\MyNewProject.dll
Absolute Reference
PS C:\SourceCode> Import-Module C:SourceCode\MyNewProject\bin\Debug\MyNewProject.dll
Installing it in your Module Path
First, verify your module path by running the following:
PS C:\> $env:PSModulePath
C:\Users\swoogan\Documents\WindowsPowerShell\Modules;C:\Windows\system32\WindowsPowerShell\v1.0\Modules\
The first path is specific to your logged in user. The second is a system wide path available to all users. Any additional paths may have been installed by third parties.

This leads to two possible options for you to install your module. You can either put it in a directory already present in your PSModulePath, or you can create a new location and add it to your path. I recommend using what is already there.

Now, note that there is a little trick to installing modules this way. You need to create a folder in the module path with the same name as your assembly. For example, if you assembly is MyNewProject.dll, then you need to install it into a subfolder called MyNewProject. Here is an example of performing the installation:
PS C:\> $path = Join-Path -Path $env:PSModulePath.Split(';')[0] -ChildPath MyNewProject
PS C:\> mkdir $path


    Directory: C:\Users\csvingen\Documents\WindowsPowerShell\Modules


Mode        LastWriteTime      Length  Name
----        -------------      ------  ----
d----       8/1/2014   1:24 PM         MyNewProject

PS C:\> Copy-Item .\SourceCode\MyNewProject\bin\Debug\* $path -Verbose
VERBOSE: Performing operation "Copy File" on Target "Item: C:\SourceCode\MyNewProject\bin\Debug\MyNewProject.dll
Destination: C:\Users\swoogan\Documents\WindowsPowerShell\Modules\MyNewProject\MyNewProject.dll".

To make sure that you have installed your module correctly, run the following:
PS C:\> Get-Module -ListAvailable

    Directory: C:\Users\csvingen\Documents\WindowsPowerShell\Modules


ModuleType Name                                ExportedCommands
---------- ----                                ----------------
Binary     MyNewProject                        {Get-Something}
Script     Swoogan                             {Find-InFiles, grep}

...

Notice that the type of MyNewProject is binary, indicating it is a .NET module. If you do not see your module, you know something has gone wrong with the installation.

Now it is much easier to import your cmdlets. You no longer need to figure out the relative path or keep track of a potentially long absoulte path. You can simply use the name of the module’s folder. When first implementing, I like to import the module with the Verbose flag to ensure that I get what I am expecting:
PS C:\Users\csvingen> Import-Module MyNewProject -Verbose
VERBOSE: Importing cmdlet 'Get-Something'.

Testing and Debugging

There are two important thing to be aware of when it comes to debugging your compiled modules. The first is that re-importing the module into your existing session will not bring in changes that you have made. You need to remove the modules first:
Remove-Module MyNewProject
Second, you will not be able to build your module in Visual Studio once you have imported the module. PowerShell will maintain a lock on the file until you unload your session.

I like to write a Test.ps1 script, that I load in the PowerShell ISE, for testings:
Import-Module .\bin\Debug\MyNewProject.dll
Get-Something
Remove-Module MyNewProject
Notice that the import uses the relative path in this case, since installing it is reserved for a completed project. Also note that you import with a path, but remove with just the module name.


Since this post has become a lot longer that I was expecting, I am going to split it in two and demonstrate Advanced Functions in the next installment.